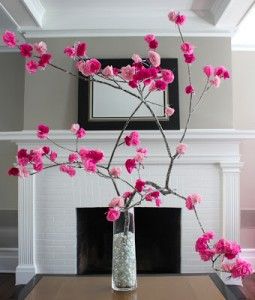
Creating a sustainable cherry blossom tree is a fun and rewarding project demonstrating your commitment to the environment and your love of nature. By using recycled paper to create this beautiful work of art, you’re not only reducing waste and conserving resources, but you’re also tapping into your own creativity and imagination.
So why take a break from your usual routine and celebrate spring sustainably and meaningfully? Your cherry blossom tree will not only be a beautiful addition to your home decor but will also serve as a reminder of the beauty and power of nature and our responsibility to protect and preserve it for future generations.
Materials Needed for The Cherry Blossom Tree
Before you get started on your cherry blossom tree, you’ll need to gather a few materials. Here’s what you’ll need:
- Old newspapers or magazines
- Scissors
- Glue
- Brown paper or cardboard for the trunk and branches
- Pink or red paint or tissue paper for the cherry blossoms
You may also want to have a ruler or measuring tape handy to ensure that your tree is symmetrical and well-proportioned. Once you have all of your materials, you’re ready to start creating your beautiful and sustainable cherry blossom tree.
| Highlights | Description |
| Use old egg cartons to make flowers | Small, simple flowers can be made by painting and shaping the egg cartons. |
| Create a trunk from paper towel rolls | Roll several paper towel rolls together for a sturdy trunk. |
| Wrap plastic bags into cherry blossoms | Twist plastic bags into small cherry blossom shapes before attaching them to the tree. |
| Use tissue paper for fuller flowers | Tissue paper can be layered for more realistic flowers. |
| Add glitter for a touch of magic | Sprinkle glitter over the finished flowers and trunk for a sparkling effect. |
Step-by-step Instructions for Creating The Tree Trunk and Branches
The first step in creating your recycled cherry blossom tree is to make the trunk and branches. Here’s how to do it:
1. Cut a piece of brown paper or cardboard into the shape of a tree trunk. Depending on your preference, you can make it as tall or as short as you like.
2. Cut several smaller pieces of brown paper or cardboard into the shapes of branches. You’ll want to vary the sizes and angles of the branches to make your tree look more natural.
3. Glue the branches onto the trunk, making sure to leave some space between them so that you can add the cherry blossoms later.
Once you’ve completed these steps, you’ll have the basic structure of your cherry blossom tree. It’s time to add those final details and make it perfect!
Making the Cherry Blossoms from Recycled Paper
The cherry blossoms are the most important part of your tree, and fortunately, they’re easy to make from recycled paper. Here’s how to do it:
1. Cut several small squares of pink or red tissue paper, or use pink or red paint to color small squares of recycled paper.
2. Fold each square in half, then in half again, and then in half one more time, so that you have a small triangle.
3. Cut the top of the triangle into a curved shape to create the petals of the cherry blossom.
4. Unfold the triangle to reveal a beautiful and delicate cherry blossom.
Repeat these steps with as many squares of paper as you like, depending on how full you want your tree to be. You can also vary the size and color of the blossoms to create a more dynamic and interesting effect.
Assembling the Cherry Blossoms Onto the Tree
Once you have your cherry blossoms, it’s time to attach them to the tree. Here’s how to do it:
1. Apply a small amount of glue to the bottom of each cherry blossom.
2. Press the blossom onto the branches of the tree, making sure to vary the placement and angle of each blossom so that the tree looks more natural.
3. Continue adding blossoms until you’ve filled in all of the space between the branches.
Be patient and take your time as you add the blossoms. It can be tempting to rush through the process, but the more care and attention you give to each blossom, the more beautiful and realistic your tree will look.
Not:In addition to the information we have provided in our article on
how to make a cherry blossom tree from recyclables, you can access the wikipedia link here, which is another important source on the subject.
Decorating Tips for Your Finished Tree
Once you’ve completed your cherry blossom tree, add a few finishing touches to make it even more beautiful. Here are some ideas:
- Place the tree in a decorative pot or vase filled with soil or rocks to create a more natural look.
- Add some LED lights to the tree to create a magical and enchanting effect.
- Use a fan to gently blow the cherry blossoms, creating the illusion of a gentle breeze moving through the tree.
With a little creativity and imagination, you can turn your recycled cherry blossom tree into a stunning and unique centerpiece that will bring the beauty of spring into your home year-round.
FAQ – How to make a cherry blossom tree from recyclables?
What materials can I use for a recyclable cherry blossom tree?
How do I create cherry blossoms for my tree?
Related Article: Make a Paper Towel Rose Leaf
